Let’s learn how to easily add the “Pin It Button” when someone hovers over the images on your WordPress website. The button is formally called the Save button by Pinterest, but it’s also known as “Pin It” button. It’s the icon that appears when someone hovers over an image on your website, and allows visitors to more easily save your content to Pinterest.
If you’ve been around WordPress for awhile, you may be familiar with the “JQuery Pin It Button for Images” plugin. If you have this plugin on your website, it’s time to stop using it. The plugin seems abandoned as it hasn’t been updated in nearly 5 years. It’s also using outdated methods for adding the Pinterest Save button to your website.
This blog post will use the updated method currently shown by Pinterest to add the Save button to your WordPress website. If you found yourself on this Pinterest documentation page before, you may be overwhelmed by the code. Without some experience in code, it’s nearly impossible to understand on your own.
But I’m happy to translate the Pinterest docs for you, and show you how to easily implement the Pin It button on your own website. It will only take a few minutes to get it up and running!
What You Need to Get Started
To implement the Pin It Button on hover, I recommend using the WPCode Insert Headers and Footers + Custom Code Snippets plugin. It’s a free plugin that will allow us to easily add everything we need to your WordPress website to show the Pin It Button on hover.
Before moving forward, please make sure you activate the plugin on your website.
Where Will the Pin It Button Appear?
The Pinterest Save button will appear when someone hovers over an image on your website. Please note there are two ways that images can be displayed on your website:
- Image added as the background image of a Section / Container
- Image added as HTML <img> tag
The Pinterest Save button will only appear on the HTML <img> tags.
It will not appear on background images on the page. If you find that the Pin It Button isn’t automatically displaying on every single image on the page, this is probably the reason! Some of the images on the page may actually be background images.
If you’re interested in learning more about the difference between the two types of images, let’s compare the images at the top of the Delphine theme home page. The image at the very top of the page is an example of a background image. The next two images on the page are actual HTML images.

If we inspect the source code for the background image, you will see that the full-screen image is added as the CSS property “background-image.”
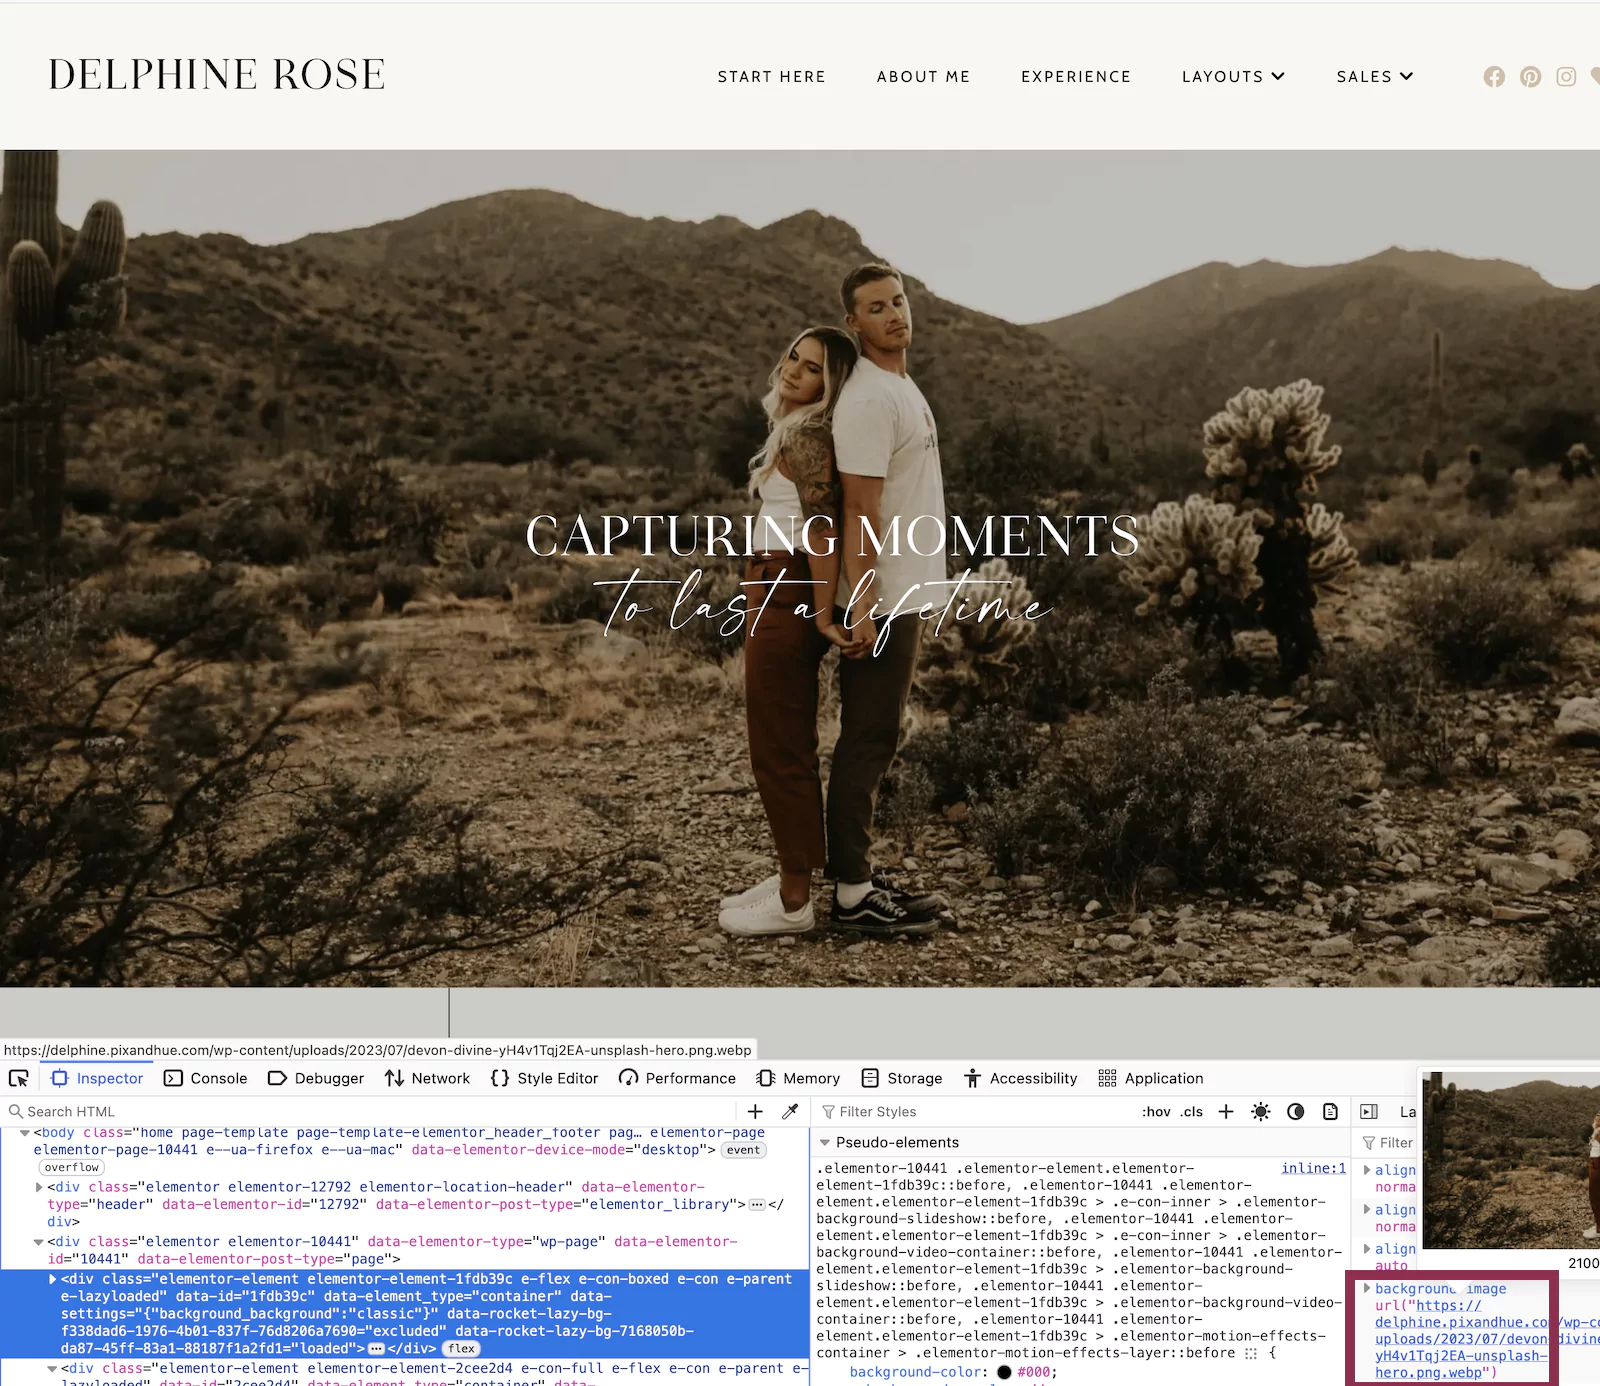
In contrast, if we inspect one of the images in the second section, you will see that it is an HTML <img> tag in the source code. The Pinterest Save button will be added only to the actual HTML images on the page.

So in the example of the Delphine theme, the Pin It Button would not display when someone hovers over the top image on the page. However, the button would appear when someone hovers over the two images in the second section on the page. It’s just something to keep in mind when you are testing how the Pinterest Save button works on your own website.
Add the Pin It Button on Hover
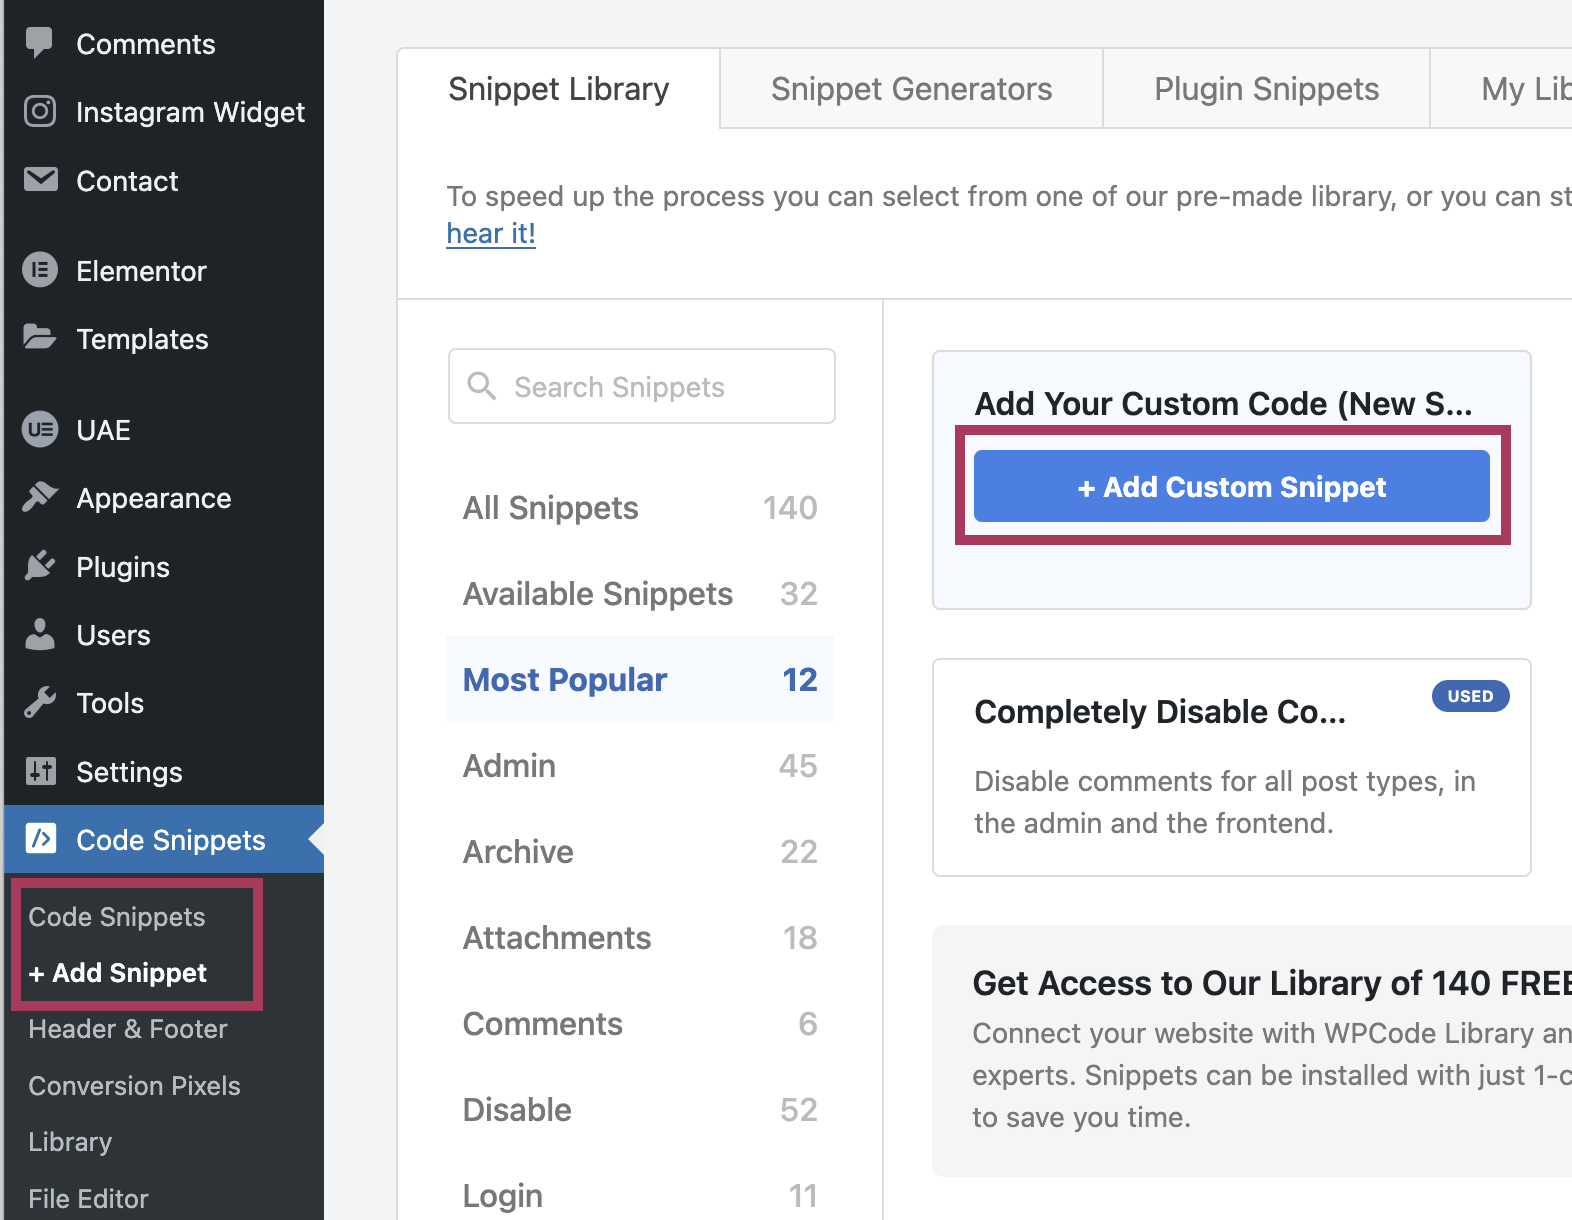
After the WPCode Lite plugin is activated on your website, from the WordPress Dashboard, go to Code Snippets > + Add Snippet.
On the next screen that appears, hover over the very first item called “Add Your Custom Code (New Snippet). Click on the blue button +Add Custom Snippet as shown in the screenshot below.
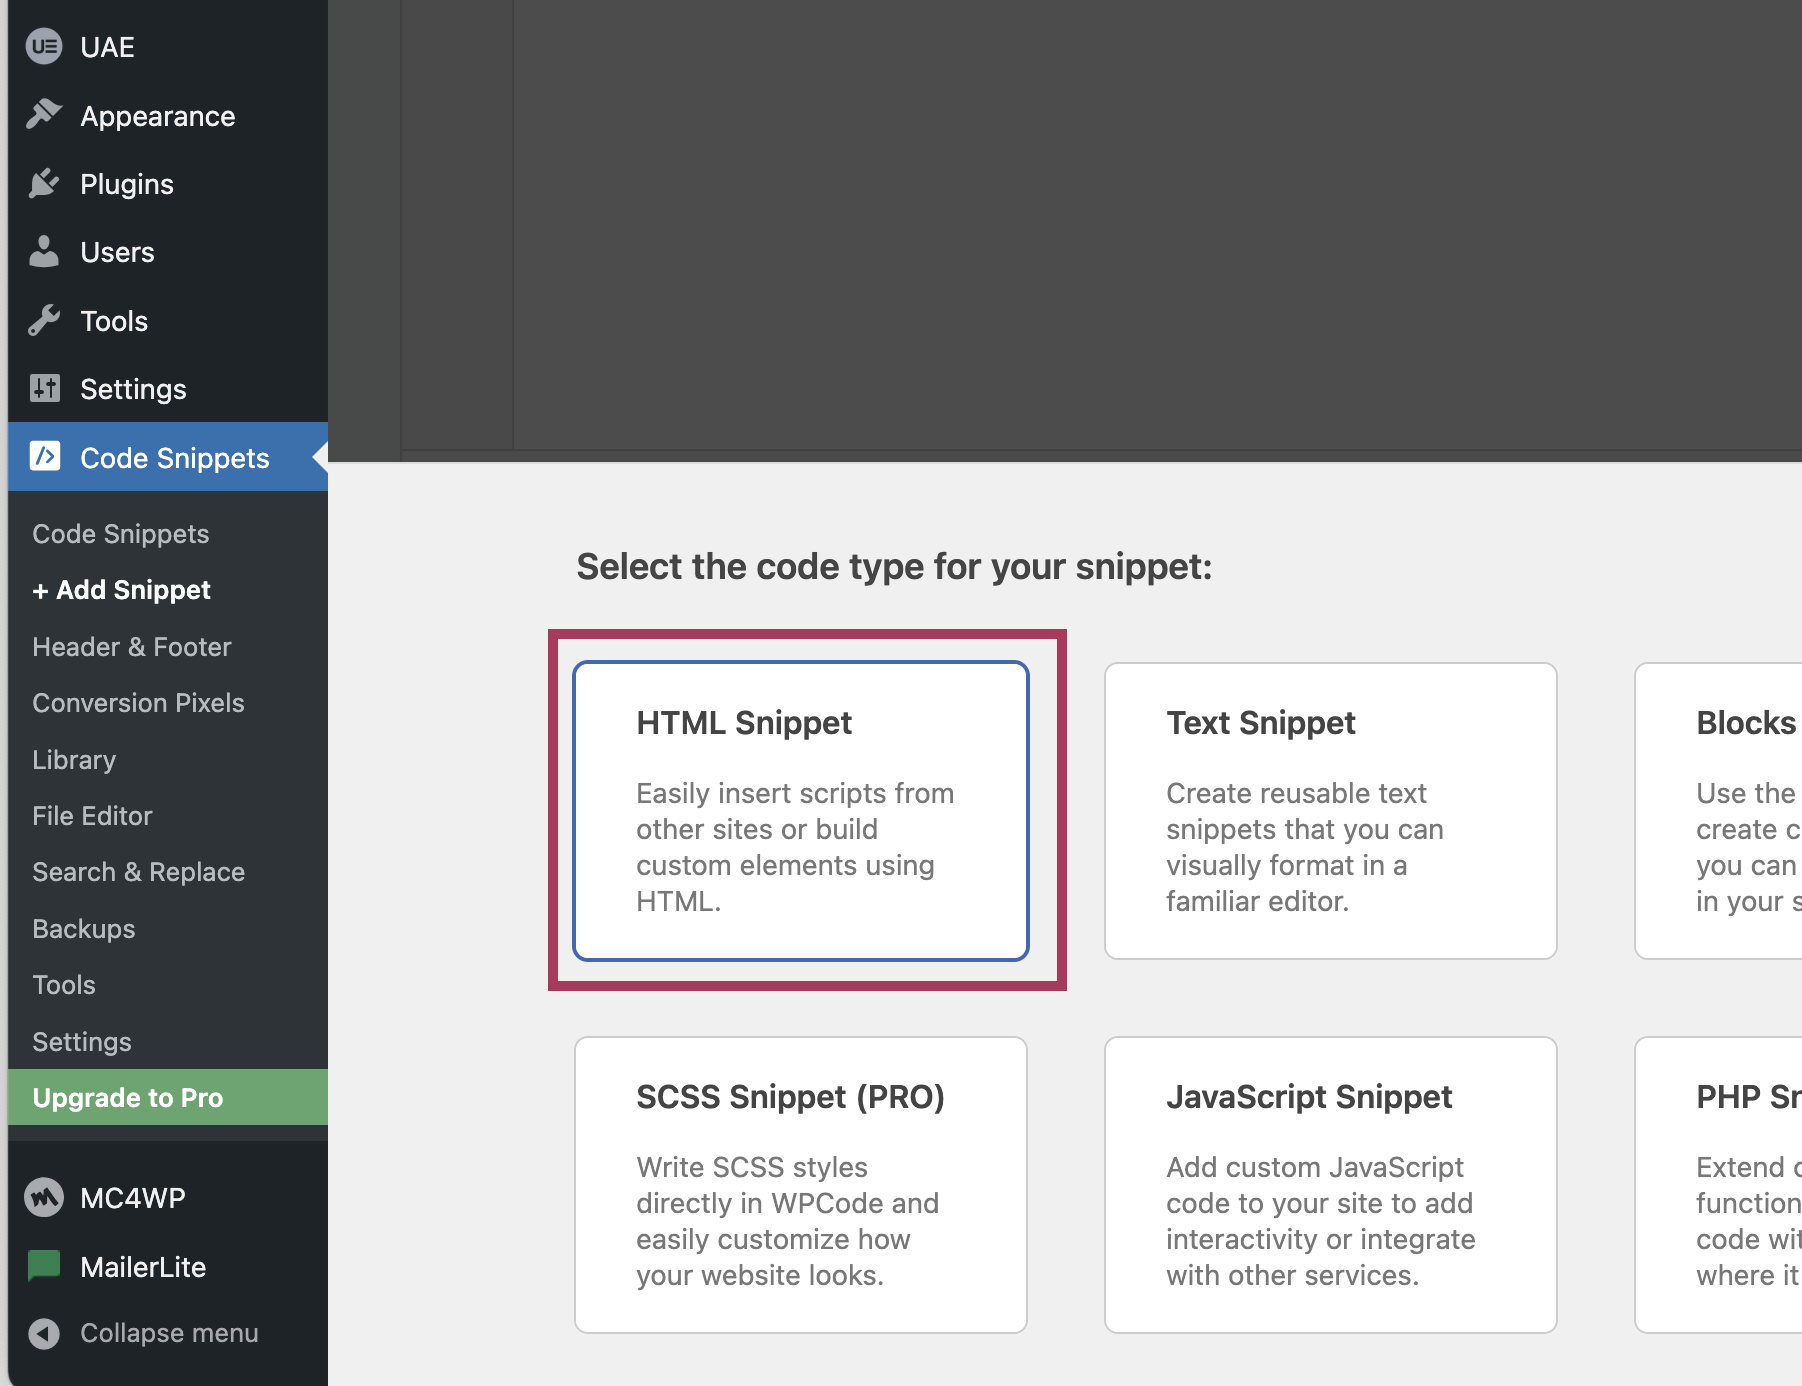
You will immediately be prompted with a pop-up window that appears at the bottom of the screen, like in the screenshot below. The default option is HMTL Snippet. We want to keep this option, so click on the HTML Snippet option to move forward.
At the top of the screen, give your code snippet a name like Pinterest Save Button on Hover.
Select the code below and copy it. Under the Code Preview box, paste in the code as shown in the screenshot below.
<script
    type="text/javascript"
    async defer
    src="//assets.pinterest.com/js/pinit.js"
	data-pin-hover="true"
	data-pin-round="true"
	data-pin-tall="true"
></script>
Next, set the Location to Site Wide Footer.
Finally, by default, the code snippets are set to Inactive. At the top of the screen, toggle the button so that the code is Active and click Save Snippet. And that’s literally it!
If your refresh your website, you should now see the Pin It button appear when you hover over all HTML images. Was that easier then you thought? I hope so!
Only Show the Pin It Button On Single Posts
With the free WPCode Lite plugin, we have the ability to control where the Pinterest Save Button is shown on your website. For example, you may only want the button to appear on single blog posts, instead of all WordPress posts and pages.
Within the same Code Snippet screen, if you continue scrolling down, you will find additional options to show / hide the button using the Smart Conditional Logic options.
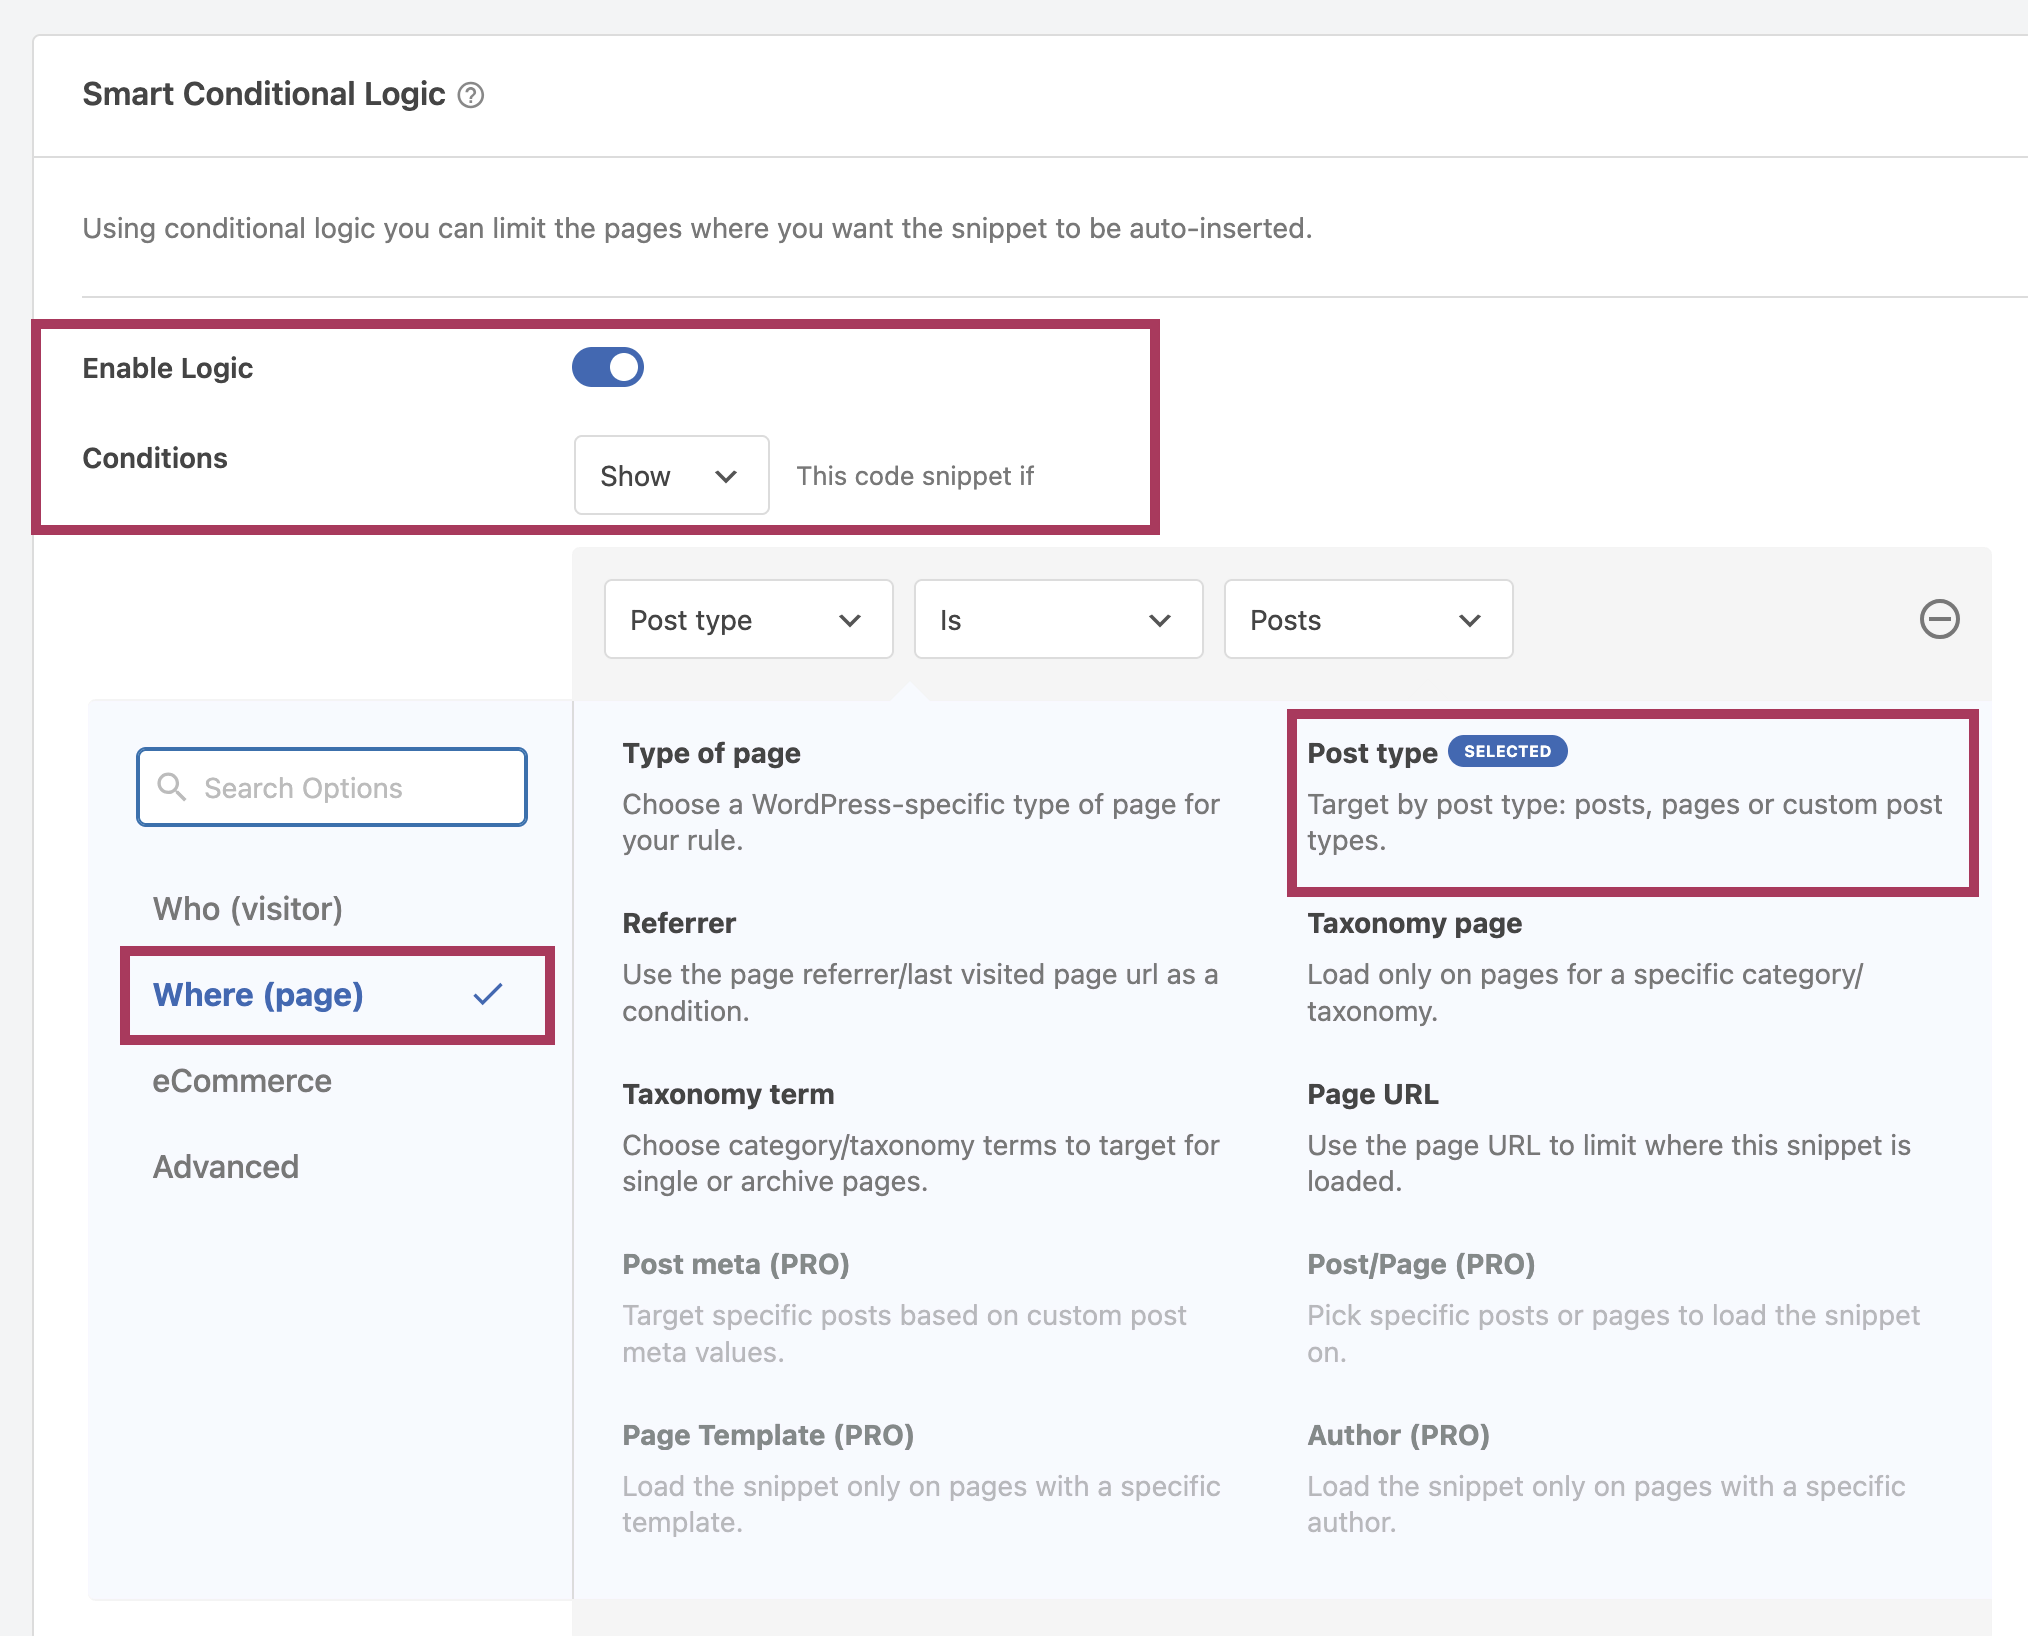
Toggle the button for Enable Logic. Make sure the Conditions option is set to to Show. Click the Add New Group button.
Where it says “Logged-in,” click on the Dropdown menu to find more options. On the left side, click on Where (page). Click on Post Type. The screenshot below shows the selections made in the Conditional Logic screen. In this case, the Pin It Button would only display on WordPress posts.
The WPCode Lite plugin gives you so much flexibility to control where the the Pin It Button is shown. For example, you could create multiple rules to show the button on certain pages (i.e. Home, Blog, About) and all blog posts. The options here are limitless – use the logic options to show / hide the Pinterest Save button however works best for your site!
Hide the Button from Select Images
As you are creating content for WordPress posts and pages, you may not want the Pin It Button to appear when someone hovers over every single image. We can use a custom solution to hide the Pinterest Save button from select images on a post / page.
1 – Add Custom Javascript Code to your Website
We will need to add one more code snippet to our website using the same method with the WPCode Lite plugin. From the WordPress Dashboard, go to Code Snippets > +Add Snippet.
Just like before under the Add Your Custom Code option, click on the blue button +Add Custom Snippet. Click on the HTML Snippet option to move forward with adding the code.
At the top of the screen, give your Code Snippet a name like “No Pin – Hide Save Button on Select Images.” Select the code below and copy it. In the Code Preview box, paste in the code as shown in the screenshot below.
<script>
jQuery(document).ready(function($) {
	if($('.pixandhue-no-pin').length > 0) {
		$('.pixandhue-no-pin').each(function() {
			$(this).find('img').attr('data-pin-nopin', true);
		});
	}

	if(typeof elementorFrontend != 'undefined' && typeof elementorFrontend.hooks != 'undefined'){
		elementorFrontend.hooks.addAction( 'frontend/element_ready/global', function( $scope ) {
			if($('.pixandhue-no-pin').length > 0) {
				$('.pixandhue-no-pin').each(function() {
					$(this).find('img').attr('data-pin-nopin', true);
				});
			}
		});
	}
});
</script>
This time, set the Location to Site Wide Header.
Finally, by default, the code snippets are set to Inactive. At the top of the screen, toggle the button so that the code is Active and click Save Snippet.
Pro tip – If you have set the Smart Conditional Logic options for the first code snippet, you can use the same logic options for this second code snippet. This will ensure all code related to the Pinterest Save button is loaded on the same areas of your website.
2 – Hide the Button from Select Images
Now that you have added the second code snippet to your website, how do you actually hide the Pinterest Save Button from certain images?
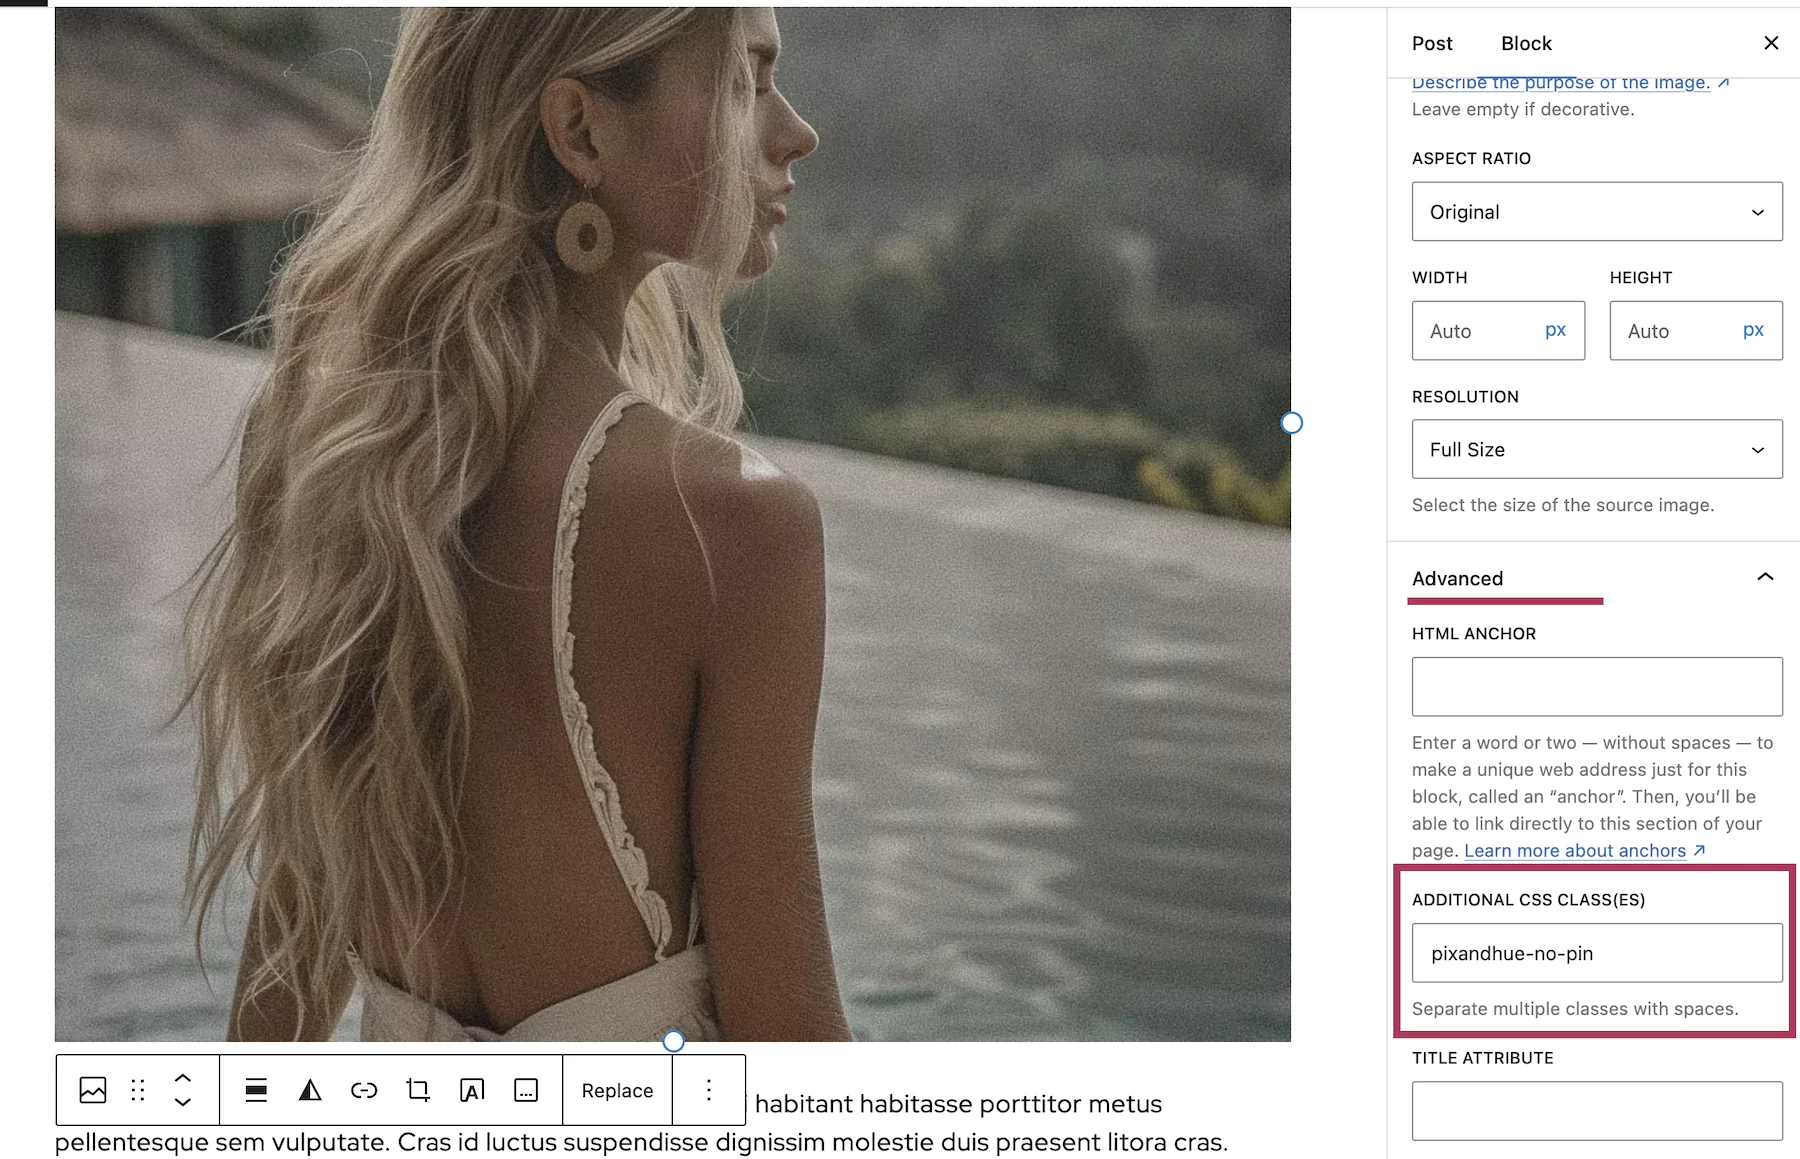
The key is to add the CSS class pixandhue-no-pin to any image on your website where you don’t want the button to appear when someone hovers over it.
As shown in the screenshot below, if you are working in the regular WordPress editor, please open the Advanced options for the image on the right of the screen. Add in the text pixandhue-no-pin to the Additional CSS Class(es) box. Now, the Pin It button will not appear when someone hovers over this image in the blog post.
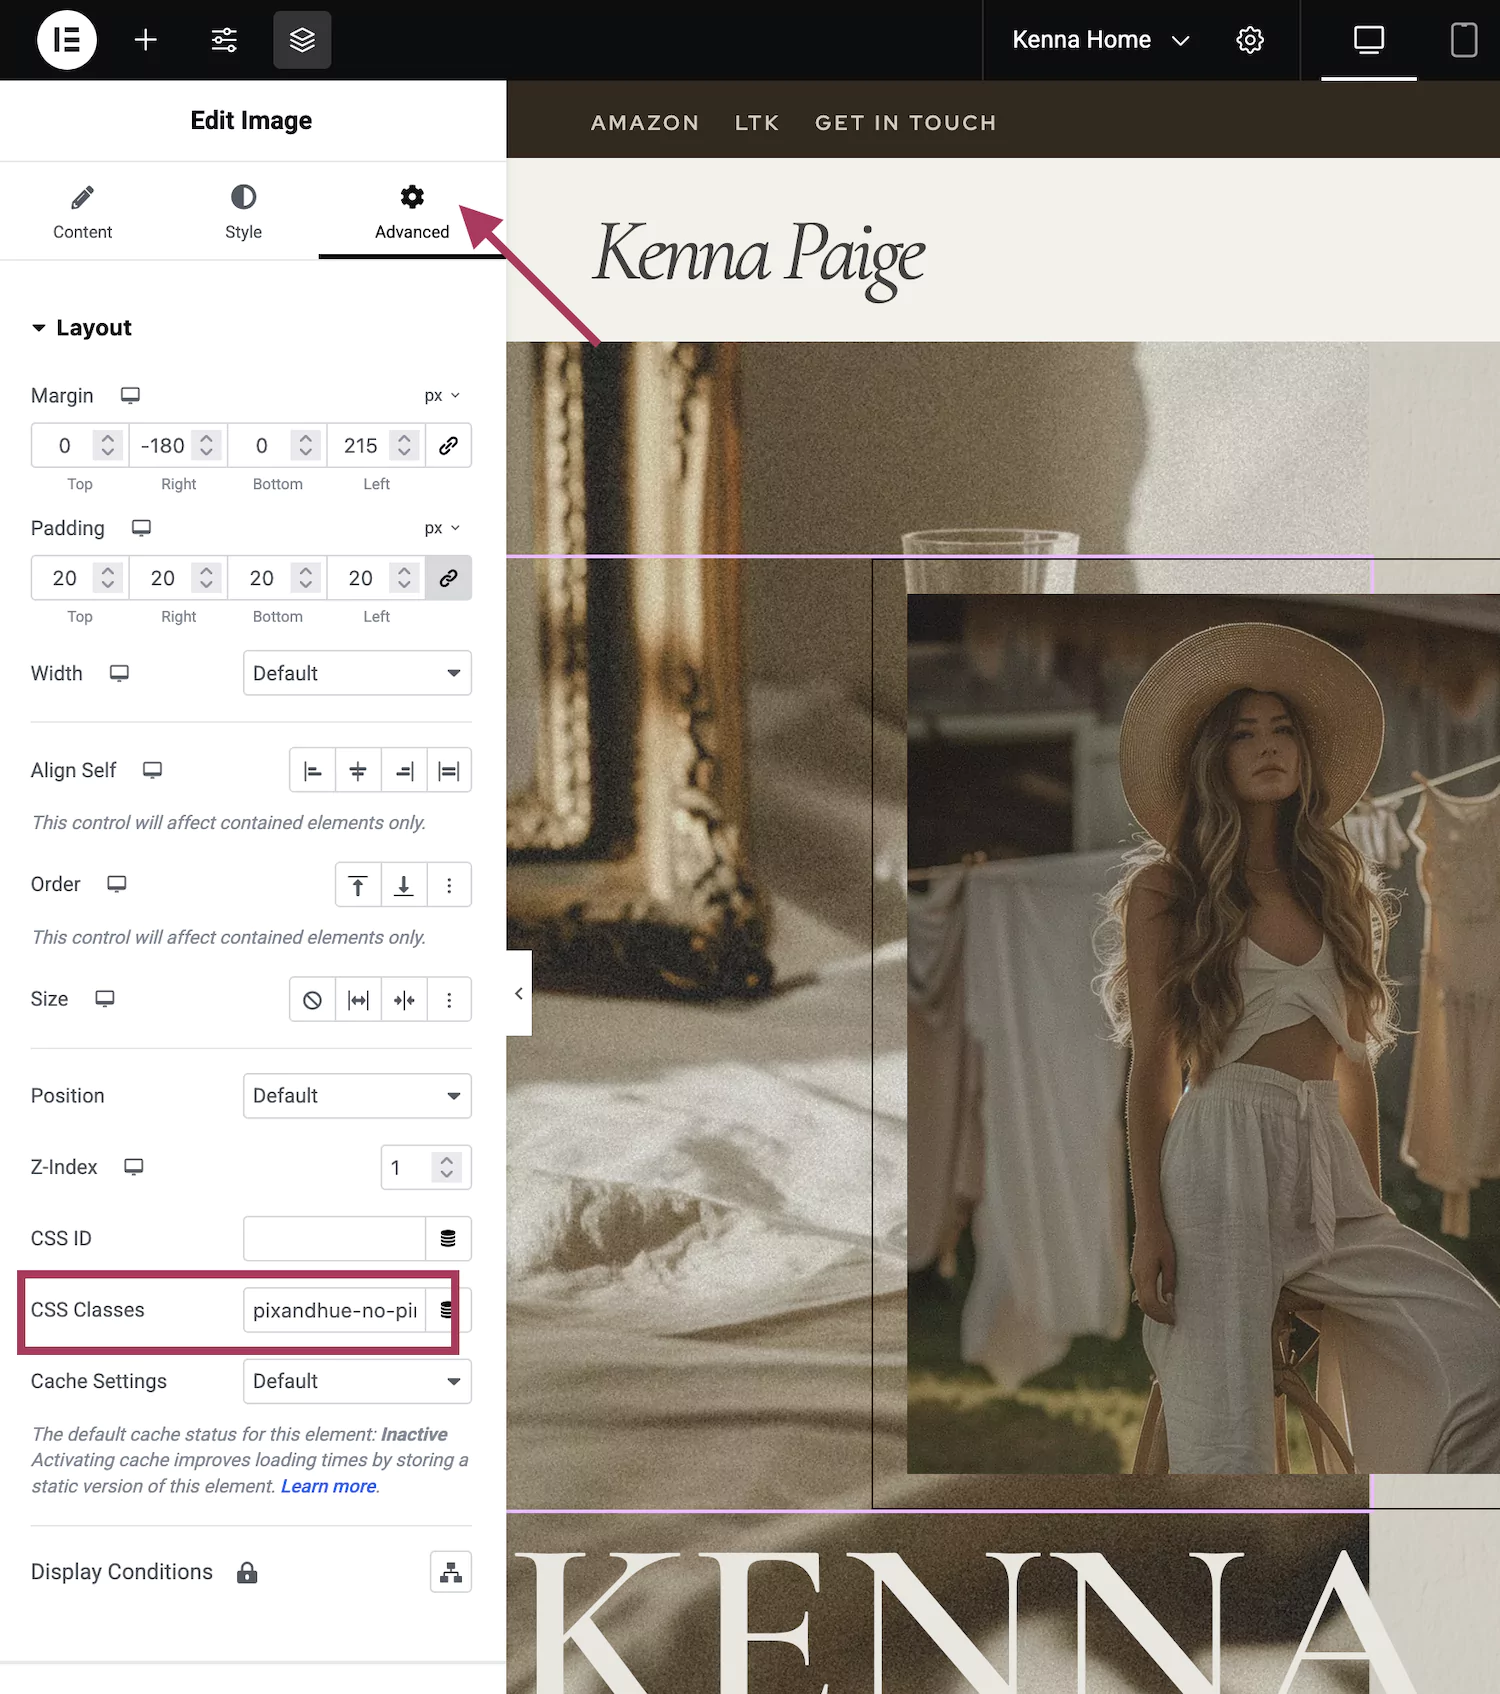
You can also add the same CSS class to the image widget in the Elementor editor. When you are editing an image widget, navigate to the Advanced tab. As shown in the screenshot below, add in the text pixandhue-no-pin to the CSS Classes box. Now, when someone hovers over the image widget, the Pin It button will not appear.
Final Thoughts
Whenever you are adding code to your website, it’s always good to review your website and make sure everything is still working properly! Additionally, I recommend testing out the new Pinterest Save button on your website. When you hover over each HTML image, do you see the button? If you click on the Pinterest icon, are you able to save the content to Pinterest?
When someone saves your website image to Pinterest, it will automatically pull the related metadata, including the Title and Meta Description. How can you change the information attached to your content?
Use a plugin like Yoast SEO to add a proper title and description for each post and page on your website. This will ensure that when your content is shared across social media, including Pinterest, you can control the information that is attached to it. Hopefully this blog post has helped you add the Pin It Button on hover to your own WordPress website. Happy Pinning!