What’s one easy (and free!) step you can take right now to make WordPress faster? Let’s learn how to bulk optimize all the images on your WordPress website. With a free WordPress plugin, you can automatically optimize your images without having to go back and re-upload them one-by-one. Saving you so much time and getting your website to load faster!
Not only is page speed important for SEO, but a website that loads faster makes for a better user experience. Faster loading times make it less likely for potential customers and clients to leave your website before getting to your actual content.

Table Of Contents:
- Why Do Images Make WordPress Faster
- Get Started with the EWWW Image Optimizer Plugin
- Make WordPress Faster with the Image Optimizer
- What About New Images Uploaded in the Future?
Why Do Images Make WordPress Faster?
You may not realize it, but when a web page loads, there is actually a lot happening behind the scenes that we cannot see! There are quite a few files being loaded in the background.
These files are essential to creating the overall design and functionality of the web page, and filling it with content. Depending on your website, you may have 100 files or more being loaded for each single page. Examples of the files include WordPress itself, plugins, the active theme, the page content, and any images and fonts that are loaded onto the page.
At a very basic level of understanding page speed – the more files you have and the larger they are, the longer it will take your website to load. One very important factor in overall page speed is the IMAGES on the page.
From a size standpoint, images files tend to be some of the biggest elements on the page. If you have several images on your page, this results in a lot of large files that need to load.
What are Optimized Images?
When website performance tools like PageSpeed Insights and GTmetrix are measuring how to make WordPress faster, they are checking two things for your images:
1 – Are the image files compressed down to the smallest size?
2 – Are the image files being served in the next-gen format of WebP?
Before we continue, what is WebP? It is an image file format that was created by Google in 2010. The idea was to keep the same quality of other image file formats (like JPEG and PNG), but reduce the file size as much as possible.
The WebP format is considered best for fastest loading times on a website. Your website will be flagged by these performance tools if you’re not using the next-gen format for images.

Images are NOT Optimized for Web by Default
While we all love stock photography websites, the images downloaded from them are the opposite of optimized for web! If you have had a photographer take pictures for your website, while I’m sure they are stunning … these are also not optimized for your website.
The image file sizes tend to be incredibly large and they will likely always be in the PNG or JPEG format. Let’s look at this gorgeous stock photo from kaboompics as an example.

The original downloaded file is a whooping 7.7MB and more than 4000px by 6000px. When we are using images on a website, a good rule of thumb is that they should be less than 1MB and also 1000px wide or less.
It’s possible that you have already created your full website and uploaded all your images without ever considering page speed or proper image size. And you’re thinking uh-oh, now what?!
Get Started with the EWWW Image Optimizer Plugin
Great news, you do not need to manually re-upload all of your image files! Phew! I recommend using the EWWW Image Optimizer plugin. You can download it for free in the WordPress Plugin Directory by going to Plugins > Add New Plugin in the Dashboard.
The EWWW Image Optimizer plugin will automatically convert all of the images in the WordPress Media Library to the WebP format, so that your pages will be updated to include the next-gen format of images and perform better on speed tools like PageSpeed Insights.
After the plugin has been activated on your website, go to Settings > EWWW Image Optimizer. The very first time you use the plugin, you will be prompted with a Setup Wizard.
How to: Setup the Plugin
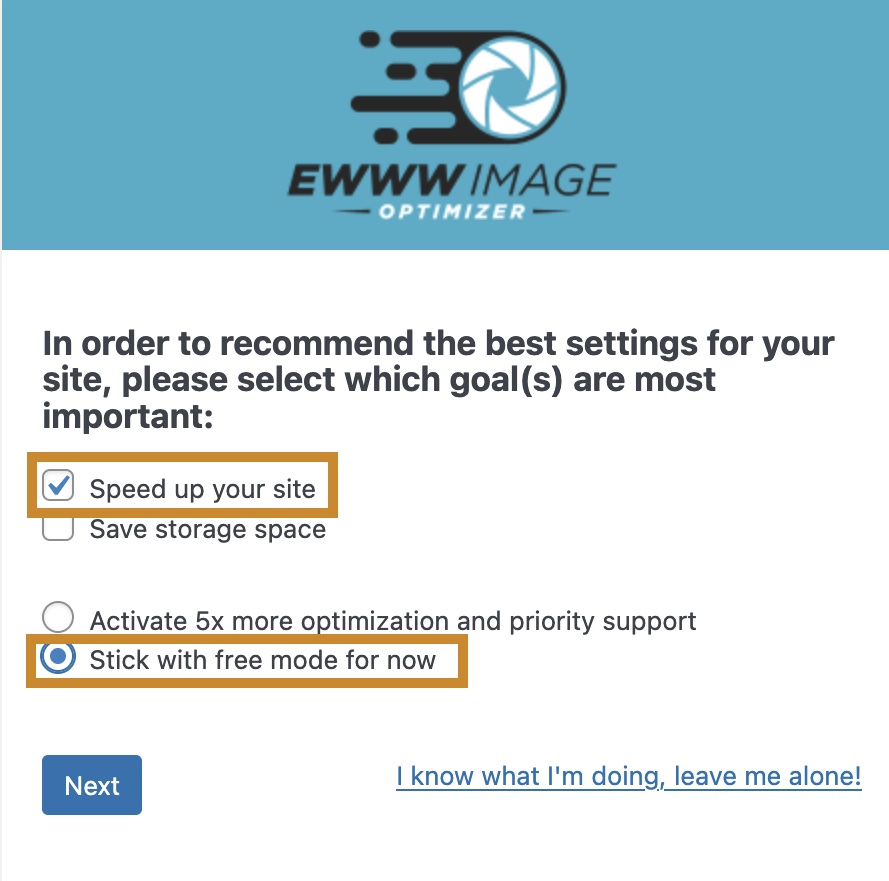
As shown in the screenshot, I recommend checking the options for “Speed up your site” and “Stick with the free mode for now.” Click Next when you have finished with your selections.
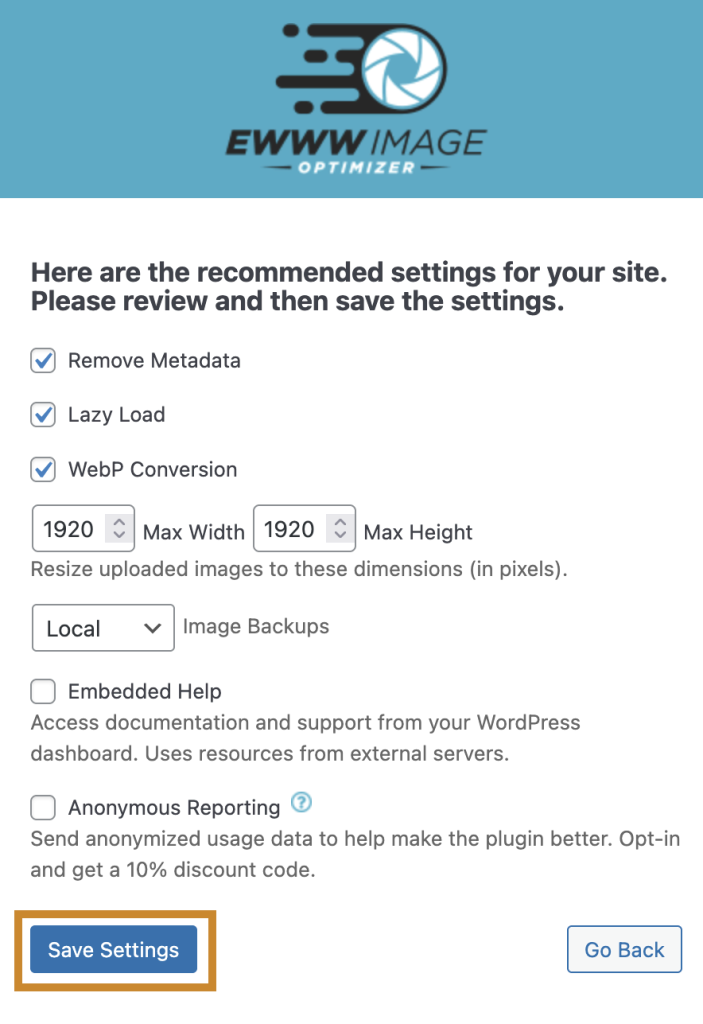
On the next screen of the setup wizard, I recommend keeping all of the default settings the same! Click Save Settings to finish the Setup Wizard.
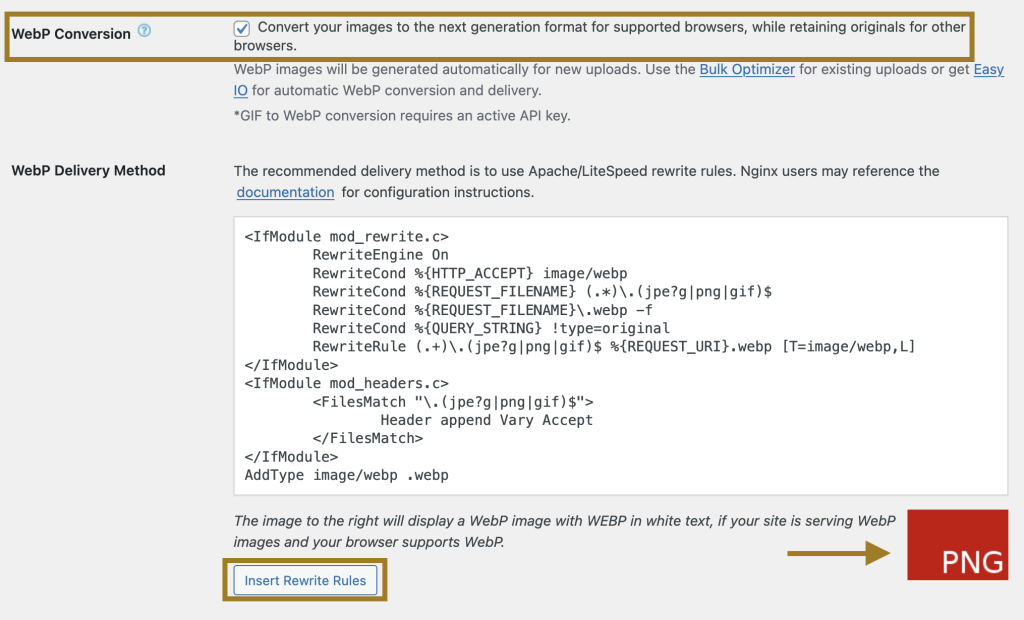
The Setup Wizard should redirect you to Settings > EWWW Image Optimizer in the WordPress Dashboard. Scroll down and check the box for WebP Conversion as shown in the screenshot.
The plugin will add special code to the .htaccess file of your WordPress site. The added code will enable the automatic conversion of your image files to the WebP format.
Click the button to Insert Rewrite Rules. You will note that the icon on the right of the screen should change from red to green after the code is added. You should also see a success message that says “Insertion Successful.”
At the bottom of the screen, click the blue Save Changes button to save the updates to the plugin settings.

Configure the Plugin for Elementor Pages
If you are using the Elementor Website Builder plugin, you will need to do an extra step to ensure all of the images on Elementor pages are automatically converted as well. To make WordPress faster, we need to ensure the plugin converts all of the images on every page.
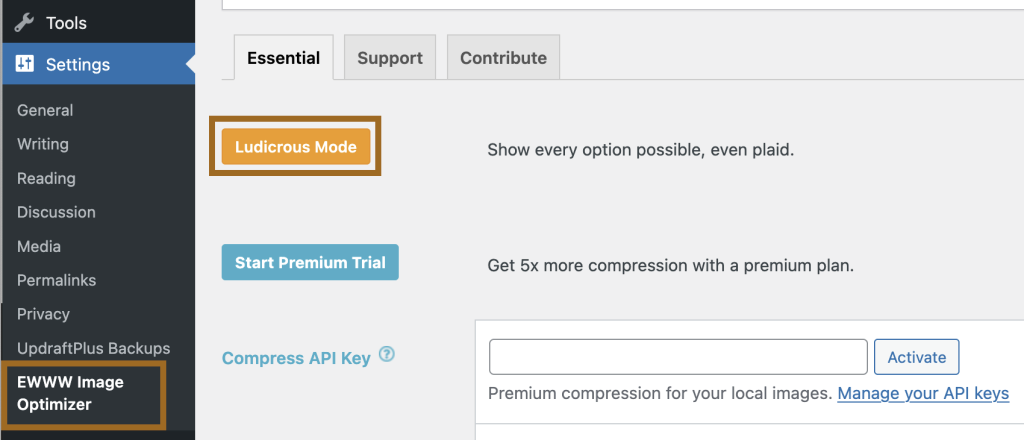
At the top of the plugin settings screen, click the button for “Ludicrous Mode.” This will show the full settings menu for the EWWW Image Optimizer plugin.
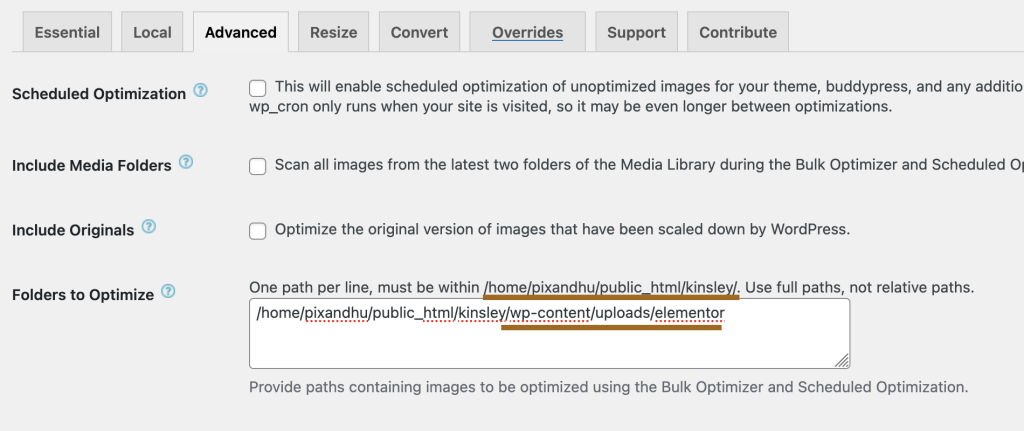
After Ludicrous Mode is activated, click on the Advanced tab. Find the option called Folders to Optimize.
The plugin will list the file path of your WordPress website. Copy this file path into the text box below. As shown in the screenshot, you need to add /wp-content/uploads/elementor to the end of the file path.
When you have added the completed file path to the text box, scroll to the bottom of the screen and click the Save Changes button.
Save Space + Reduce the Number of Image Sizes
Before moving forward, let’s consider saving space on your web hosting server! WordPress will keep up to 10 files for each image in the WordPress Media Library. So if there are 50 images in the Media Library, WordPress has actually saved 500 files on your web server.
When the EWWW Image Optimizer process is running, by default, it will make a copy of every single file for each image. So if you use the Bulk Optimizer for the entire Media Library, you will now have 500 x 2 = 1000 files saved in the background of your WordPress website.
And that’s only with 50 original images! You can see how this gets how of control rather quickly! All web hosting services have a limit on how much space you are allowed to use per server.
While we do want to make WordPress faster, we don’t want to max out the space in our web hosting account. So it’s a good to be a bit smarter about how images are optimized.
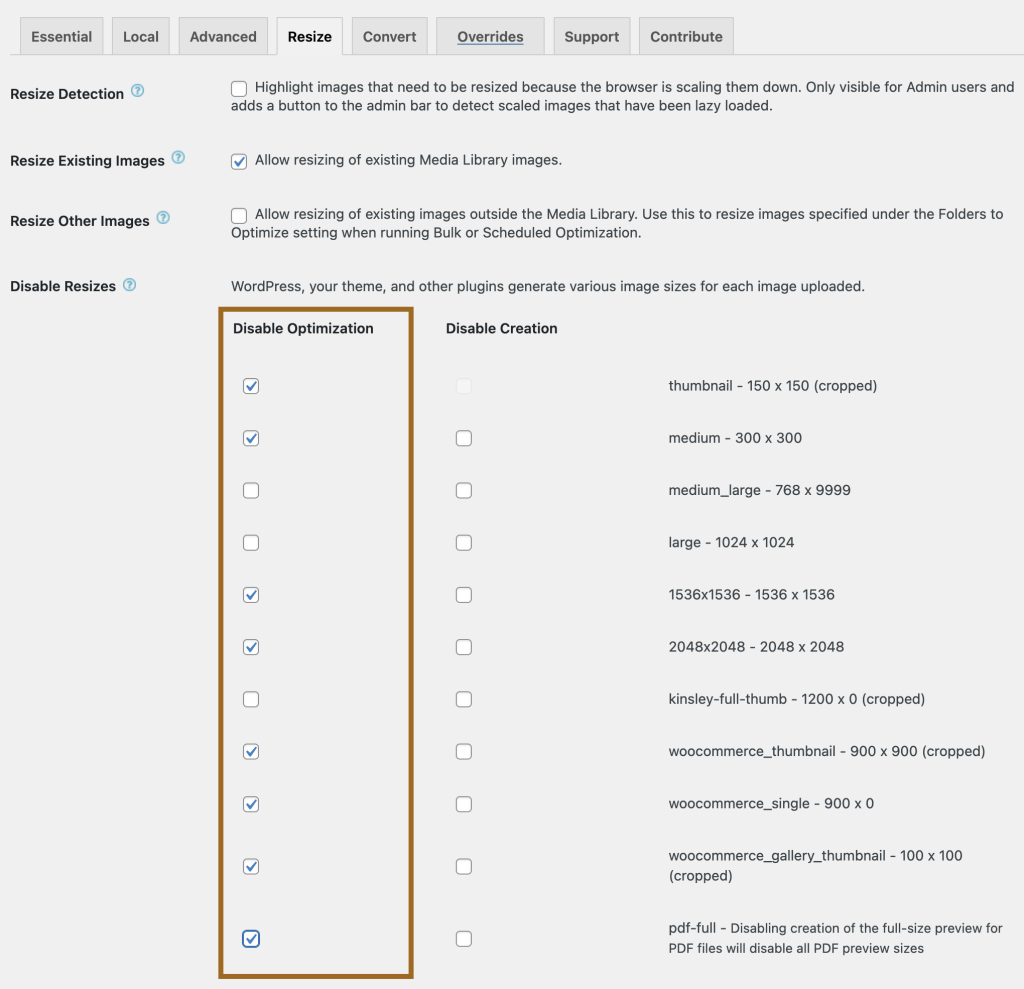
Under Settings > EWWW Image Optimizer, click on the Resize tab. Find the option called Disable Optimization. You can turn off the optimization process for certain image sizes, which will reduce the total number of files saved to your website.
Depending on the image sizes you use on your own website, I would recommend disabling as many of the image sizes as possible.
Make WordPress Faster with the EWWW Image Optimizer Plugin
This is a good time to recommend you always keep a regular back-up of your website! Many web hosting services will automatically back-up your website as part of your service, including SiteGround, which is the top hosting service I recommend for WordPress.
If you’re unsure if your web hosting service is backing up your website, you can use the free Updraft Plus plugin to back up your website.
What Happens When You Optimize?
When you run the EWWW Image Optimizer plugin, it will do two things to your photos –
#1 – It will compress the size of the original photo.
That means the plugin will change the original photo and reduce the size. If you bulk optimize your entire Media Library, it may not be easy to restore the original photos without a significant effort on your part.
#2 – It will create a duplicate copy of the image in the WebP format.
For the second item, the WebP format is created in addition to what you have in your Media Library, and it does not affect the original image.
If you are a photographer or someone who cares a lot about how photography is displayed on your website, I recommend testing this process out for a couple of images on your website.
Best Practice: Optimize A Few Test Images
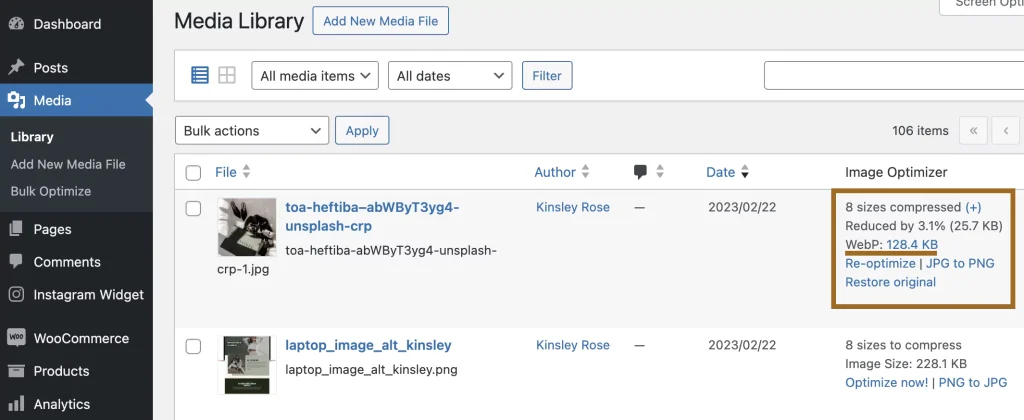
To start compressing and converting the images on your website, navigate to the WordPress Media Library. As shown in the screenshot below, make sure the List View is enabled.
Before optimizing all of the images in your Media Library, I recommend testing out a couple of images. Click the Optimize Now button to compress the photo and automatically convert it to the WebP format. Repeat this step for a couple of photos.
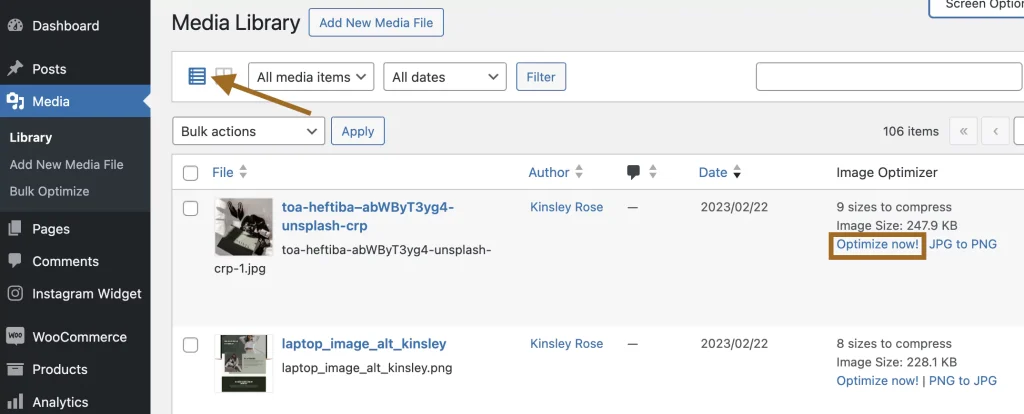
After an image has been optimized, you will see the Image Optimizer indicates the image has been compressed. It also now includes a link to the duplicate image in the WebP format.
Let’s Optimize the Media Library
Go to the front-end of your website, and review the images that have been converted to the WebP format. Are you comfortable with the quality and display of the images? If so, you can move on to convert the rest of the images in the WordPress Media Library!
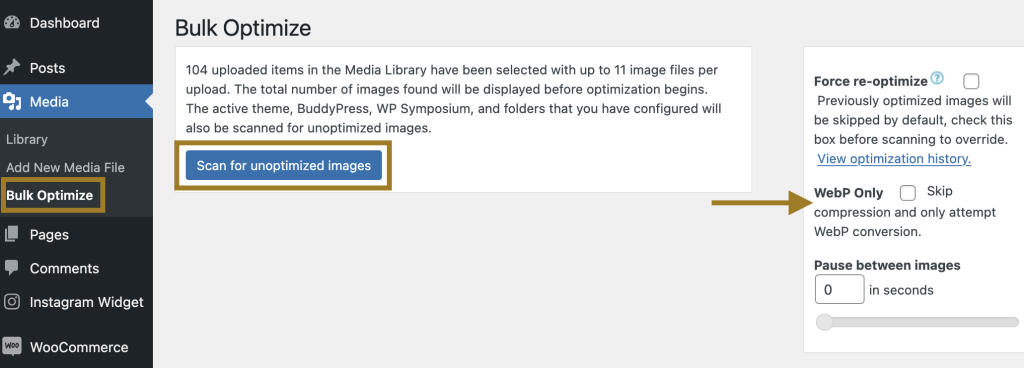
Go to Media > Bulk Optimize. Click the button to Scan for unoptimized images. Please note, one option is to skip compressing the original photos and just generate a duplicate of the WebP format.
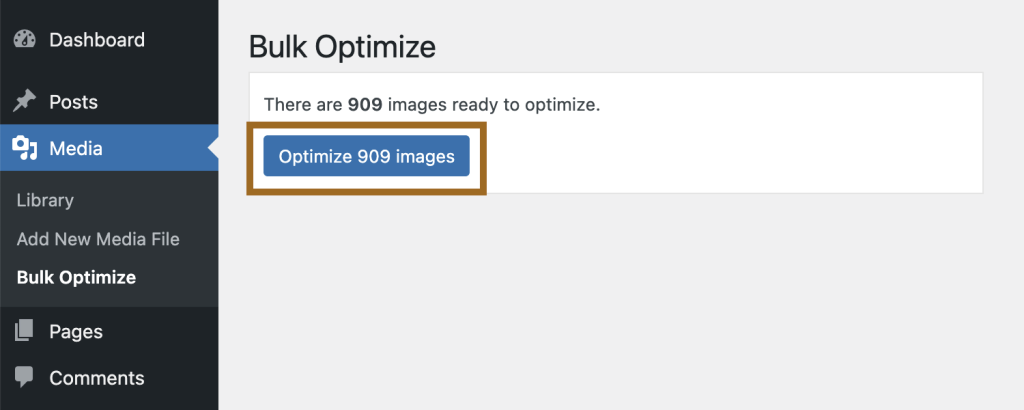
After the scan is complete, it will have you confirm that you want to optimize the specific number of images in the Media Library.
Additionally, if you have properly updated the Folders to Optimize option in the plugin settings, the Bulk Optimizer will also automatically compress and convert the images that are displayed on Elementor posts and pages.
Click the blue Optimize images button to start the automatic optimization process and make WordPress faster for of all your posts and pages!
Depending on the number of photos in your Media Library, it will likely take several minutes for the optimization process to run. The plugin displays a helpful progress bar with a time remaining estimate so you get an idea of how long it will take fully optimize the Media Library.
When the optimization process is completed, you should see a message that says Finished. If you go to the List View of the Media Library, you should see that each image has been compressed and also includes a link for the image in the WebP format.
What about new Images in the Future?
This blog post has been focused on how to make WordPress faster based on the existing photos in your Media Library. It helps to compress all of your existing photos and convert them to the WebP format. So what about new photos that are added in the future?
The EWWW Image Optimizer plugin will actually automatically convert new photos added as well! No further action is required, it will just keep optimizing in the background of WordPress.
This can be a great solution for many people, depending on how often you are adding content and uploading new photos.
If you are someone who uploads a relatively small number of photos and is not concerned about the space within your web hosting account, I would recommend continuing to use the EWWW Image Optimizer plugin to save time and handle the automatic conversion for you.
In contrast, if you are someone that uploads a significant number of photos, I would recommend manually preparing your photos before uploading them to WordPress. Yes, this will take some extra time up front. But the EWWW Image Optimizer plugin can significiantly impact the storage on your website without you even realizing it’s happening!